July 11, 2013

E-portfolios and Webfolios: the same thing?

First of all, what are e-portfolios? And are e-portfolios and webfolios the same?

As I am a highly visual learner, I've selected two very interesting videos on the topic.

"It's an easily accessible online area where you store all you think is important to your career development."


"They serve as a student's professional digital footprint showcasing a combination of student's work in different formats over a period of time."


 A key word mentioned in this last video is REFLECTION. I'm a great fan of e-portfolios myself  as it can help learners reflect about their  own learning and it's EVIDENCE of what students have learned.

In my opinion, the use of e-portfolios is one of the best ways to evaluate student's progress as well.

In order to help me understand more about e-portfolios, I've also read some articles about their use in education.

An article I really enjoyed reading was
"Portfolios to Webfolios and Beyond: Levels of Maturation" written in 2004 by Douglas Love, Paul Gathercoal and Gerry McKean. In the article, the authors describe different levels of maturation when adopting e-portfolios as an educational tool. The image bellow taken from the article is the taxonomy developed by them.


They also make a distinction between e-portfolios and webfolios.

http://www.educause.edu/ero/article/portfolios-webfolios-and-beyond-levels-maturation

Another visual resource which I found very useful was the infographic below taken from the blog post http://www.pontydysgu.org/2013/02/issues-in-developing-and-implementing-e-portfolios/ . The blog post mentions the original article which inspired the infographic in which a dichotomy is  brought forth:  e-portfolios for LEARNING X e-portfolios for ASSESSMENT.
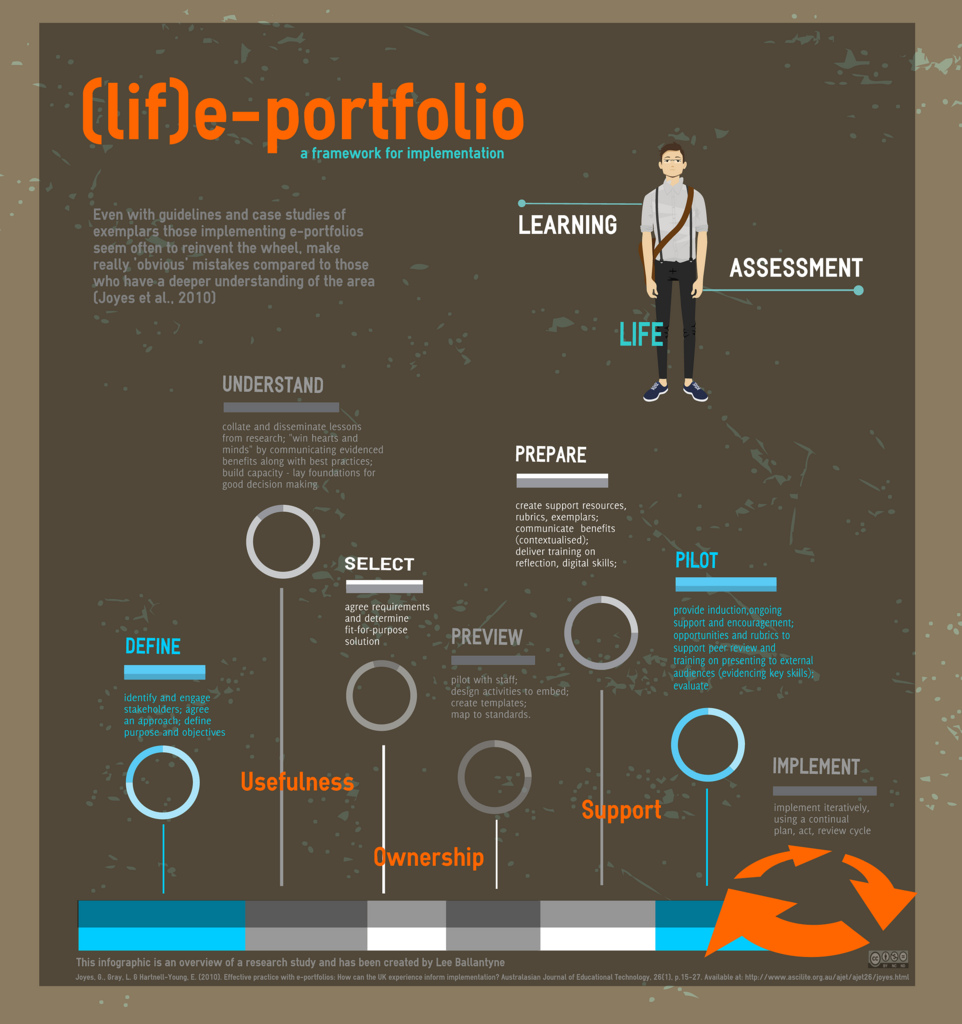
Diagramme: @lee74 (some rights reserved) http://www.flickr.com/photos/lee8/7164889790/
I've been teaching online since 2009 and I've used different tools to have my students create digital portfolios. First, I had my students use BLOGGER for their blog-portfolios. Then, for many years I opted for the POSTEROUS platform which was very easy to use as you could post by sending e-mails. However, unfortunately, Posterous has closed down and if you haven't exported it to another platform, bad luck, the blogs are gone. This year, a few weeks before I started a new online course, I had to rush to find another alternative to Posterous and I ended up choosing TUMBLR, for its ease in publishing different media and its popularity. A drawback I found was that you can't easily leave and receive comments in TUMBLR so that would limit the type of communication I wanted.
I myself made use of a platform to create my own learning portfolio for one of the subjects I took at UFU, Universidade Federal de Uberlândia, while doing my M.A. in Linguistic Studies. We were free to choose what format of portfolio we created, either paper of digital and my choice was a wiki at WIKISPACES. My first doubt at the beginning of the semester was what to include in my digital portfolio for that specific subject at university. I decided to keep adding everything which I thought would be EVIDENCE of what I had been learning. 
Next semester, I'm moderating a new group for the CULTURA EDTECH online course and my choice for the webfolios is WEEBLY. It's super easy to create your Weebly blog / portfolio. I liked the way you can drag and drop elements into the editing dashboard and create your blog posts. Apart from being able to publish at the website, you can also download the weebly app and post on the go.
But these are not the only platforms we can use to create digital portfolios, there are many others. 
These are some of the blog posts I've curated on tools to create portfolios:
If you still wish to learn more about the topic, another great resource is this PREZI presentation


July 7, 2013

CULTURA EDTECH new group 01 August

What's CULTURA EDTECH? It's an online course for EFL and ESL teachers worldwide.

How is it different from other courses? It's a 3-month course aimed at helping teachers reflect about technology integration.

The groups are generally small so that we can build a community of teachers who can learn together. 

Are you an experienced teacher but don't feel comfortable with the digital tools  and apps available nowadays? This might be an interesting course for you, where you can get all the support you need.


 We've already had students from different parts of Brazil, as well as from England, the U.S., Spain and Japan. Apart from living the experience of learning online you'll learn how to use different online platforms which could be used with your own students.

 For more info http://culturaedtech.wikispaces.com/ABOUT+THE+COURSE

June 13, 2013

My story behind the word BOX


A few weeks ago, I was contacted by one of Onestopenglish editors about writing a story for a section of the MacMillan Dictionary Blog entitled STORIES BEHIND WORDS. I've always liked stories; I believe you can learn a lot through them. After reading some of the stories already shared in the blog, I chose to share a story which I've already written in Portuguese, in my M.A. dissertation, but this time the story would be told in English.

This is my story:

2009 was a singular year in my life. I was diagnosed with breast cancer and had to stay home during the treatment. As I couldn’t be in a real classroom, I moderated an online course for teachers. During my treatment, one of the participants of the course lost her mom to the same disease. Some weeks later, this teacher e-mailed me asking if she could send me a box with gifts she had bought for her mom but had no chance to give her before her passing. She told me she would send a book about cancer which would help me a lot. I was deeply touched by her offer and answered that I was honored to receive such a special gift.
One day, as I got home feeling a bit dizzy after a chemo session, I saw a big box on my sofa. “Wow, what a big box!”, I said. “It’s Andressa’s box!”, I explained while taking the box to my bedroom. I sat down on my bed and started opening the box. Inside the post office box, there was a beautiful second box tied with a purple ribbon. I was caught by surprise when I opened its lid and felt like a little girl opening Christmas presents.
Inside the box, there was the promised book along with delicate paper flowers, pieces of colored paper and several little gifts. In every little detail, I could notice Andressa’s love for her mom and her kind gesture in including little treats specially for me, such as messages about education, hope and faith. I recorded a video message thanking my student and for the first time, wrote about my fight against cancer and the beautiful box which had brought me enormous joy and hope.


June 6, 2013

2 QRCODE activities ready for use

I've been trying out different QR CODE activities and would like to share two which I think worked really well.

Conversation Tic Tac Toe

1. Print one sheet for each pair of students.
2. Pair students up and ask them to use one notebook to draw a TIC TAC TOE grid (example below).
3. Students decide who is the cross and who is the nought. One person starts the game by choosing a number on the grid, scanning that specific code, reading the secret topic and speaking about it for 1 minute ( or 30 seconds for lower level students). The other student listening has the role of timing his partner. 
4. If the student can speak about the topic during 1 minute without stopping, he can leave his mark on the grid. Then, it's the other player's turn. 
5. To win the tic tac toe, you have to cross three numbers in a row (vertical, horizontal or diagonal).


HOW TO CREATE YOUR OWN ACTIVITY


- Go to http://qrcode.kaywa.com/dashboard/ , click TEXT and type the topics you want your students to talk about.
- Open a word doc, insert a table (3 x 3) and copy and paste the QRcodes one by one. 
- Then your activity is ready for use.

Listening Dictation + Conversation

1. Print one sheet per pair of students.
2. Pair students up.
3. Students scan the codes together, listen to it and write it down.
4. Pairs ask each the questions they have written down.

For this specific activity, I prepared questions using the Present Perfect and the Present Perfect Continuous.


HOW TO CREATE YOUR OWN LISTENING DICTATION

- Go to http://qrvoice.net/?id=u8gLjf , type a question, click the BLUE BUTTON on the right to create the qr code which will take students to a voice reading your sentence.
- Copy the code and paste it on a word doc.
- Repeat the same procedure for the other questions.

June 4, 2013

My most visited RESOURCES

In the last years, I've used LIVEBINDERS very frequently for collecting resources I share during workshops and talks. In the past, hand-outs were very practical and popular. Today however, as many of our resources are online, such as links and videos, having one simple link to share at the end of a session comes in handy.

In this post, I'll use the opportunity to show two different tools we can use for that purpose:


The PEARLTREE below is a collection of my most visited LIVEBINDERS. If you click on each of the "pearls" you'll be taken to a webpage full of tabs of resources selected by me.
http://pear.ly/b-ALD 
Bank of resources : Livebinders in Ana Maria Menezes (anamariamenezes2)

 If you'd like to learn how to create your own LIVEBINDER, watch the tutorial below.

But if you'd rather try out  PEARLTREES, watch this other tutorial.

http://youtu.be/-XEdR0l-0DQ


Which one do I like most? 

Well, I still can't answer that question. I like the visual layout of the "pearls" around a topic but I find them a bit too small. On the other hand, I like the linear aspect of the tabs in Livebinders and they way we can easily browse what's in each tab. How about you?

How can we use these curation tools with students?


  • - Students can use it as their digital portfolio, collecting articles, videos and material they have developed online during a course.
  • - Teachers can create a Livebinders page and have the whole class or small groups collaborate organizing content related to a topic.
  • - When organizing a webquest, you can have all resources organized in one binder for students to search.
  • - When working at the lab, the teacher can organize a binder or a pearl tree with all the websites she wants students to explore, keeping them more focussed.
  • - Use livebinders or pearltrees during presentations, it's much more practical than having lots of different tabs open on the computer.
  • - Use them during webinars to have participants explore specific tabs with examples you want them to look into.
  • - Use them in place of hand-outs.
  • - Finally, you can use them for student projects such as the ones described HERE.
  • - 10 GREAT EXAMPLES of student project Livebinders.

June 3, 2013

A feeling of QRPhoria

People don't seize to create interesting tools to help us make our QR Codes more visually appealing. 


Check out the different qrcode styles provided by http://qrphoria.com/


Click on the numbers 1-2-3-4-5-6 below the next image to see my qrcode CUBE created with
http://www.classtools.net/brainybox/14_FYggLj